Everything You Need to Know About Cuticle Nippers
Section 01
What is a cuticle nipper — and why does it matter?
A cuticle nipper is not just a manicure accessory. It is the precision instrument that separates a clean, professional result from one that looks rushed.
A cuticle nipper is a small, spring-loaded handheld tool with two sharp, hinged blades that come together at a fine point. Its job is to precisely remove dead cuticle skin, hangnails, and excess tissue from around the nail plate — the thin strip of skin that attaches to the base of the nail and seals the space between your skin and the nail bed.
Why does that seal matter? The cuticle acts as a natural barrier against bacteria and fungi. When you maintain it properly — not by ripping it off, but by trimming only the dead tissue — you prevent infections, keep the nail bed healthy, and create a clean canvas for polish or gel application.
Used correctly, a quality nipper is one of the most impactful tools in your entire kit — whether you are doing a quick home tidy-up or a full Russian manicure at the salon.
Section 02
Anatomy of a cuticle nipper
Before you can choose the right nipper, you need to understand its parts. Every specification — jaw size, blade shape, spring type, joint type — refers to a specific physical component of the tool.
Blades & jaw
The two sharpened cutting edges that meet at the tip. The length of these blades is what we call the "jaw size." The shape and angle of the blades determine what kind of work the nipper excels at.
Joint / hinge
Where the two halves of the nipper are riveted together. The joint quality determines how tight, smooth, and wobble-free the tool feels. Box joints are the highest quality; lap joints are common in mid-range tools.
Spring
The mechanism that keeps the blades open between cuts and provides the "bounce-back." Comes in single, double, or barrel variants. Spring quality directly affects hand fatigue during long sessions.
Handles
The two arms you squeeze. Length, width, and surface finish all affect control and comfort. Straight handles suit most grips; rounded or offset handles can reduce wrist strain for technicians who work daily.
Section 03
Tip & head shapes: recognizing the difference
This is where most beginners get confused — and where experienced techs make their most deliberate choice. The shape of the tip (also called the head shape) controls how you access the cuticle zone and how aggressive the cut is.
Standard / Rounded tip
The most common shape. The blade has a gentle, rounded profile with a less aggressive point and a more forgiving angle. Ideal for general cuticle trimming, suitable for most nail shapes, and the safest choice for beginners. Because the blade angle is modest, there is less risk of nicking live skin. This is the shape you'll find on most entry-level and mid-range nippers.
Tapered tip
The tapered head has a steeper, more aggressive blade angle. The cutting edge slopes down more sharply toward the tip, letting the tool fit easily into narrow corners, the lateral nail folds, and tight spaces around the nail bed without repositioning the tool as much. Tapered nippers provide a more aggressive cut and are widely regarded as the best all-around choice for professional nail technicians who need speed and access in equal measure.
Tower point tip
The most extreme shape. Tower point nippers have the narrowest blade and the thinnest, sharpest tip available. They are specifically engineered to reach areas that are physically impossible to access with a standard or tapered shape — deep nail folds, the very corner of the nail, tight cuticle pockets on toes. This shape demands a steady, experienced hand. The exceptional sharpness of the tip means a small mistake can nick skin more easily.
Square head
Some nippers feature a squared-off jaw profile, which allows the technician to rest their index finger directly on top of the head for enhanced directional control. This is a technique-specific shape — many techs who do high-volume cuticle work prefer it because it locks the tool at a predictable angle. It is not about the cutting angle so much as it is about grip ergonomics and control during fast repetitive work.
Standard / Round
Forgiving angle, general use, safe for all skill levels. Every day go-to.
Tapered
Steeper angle, reaches tight areas. The pro's daily driver. Best all-around.
Tower point
Narrowest tip, deepest access. For experienced hands and detailed work only.
Square head
Finger-rest design, consistent angle, great for fast repetitive work.
Section 04
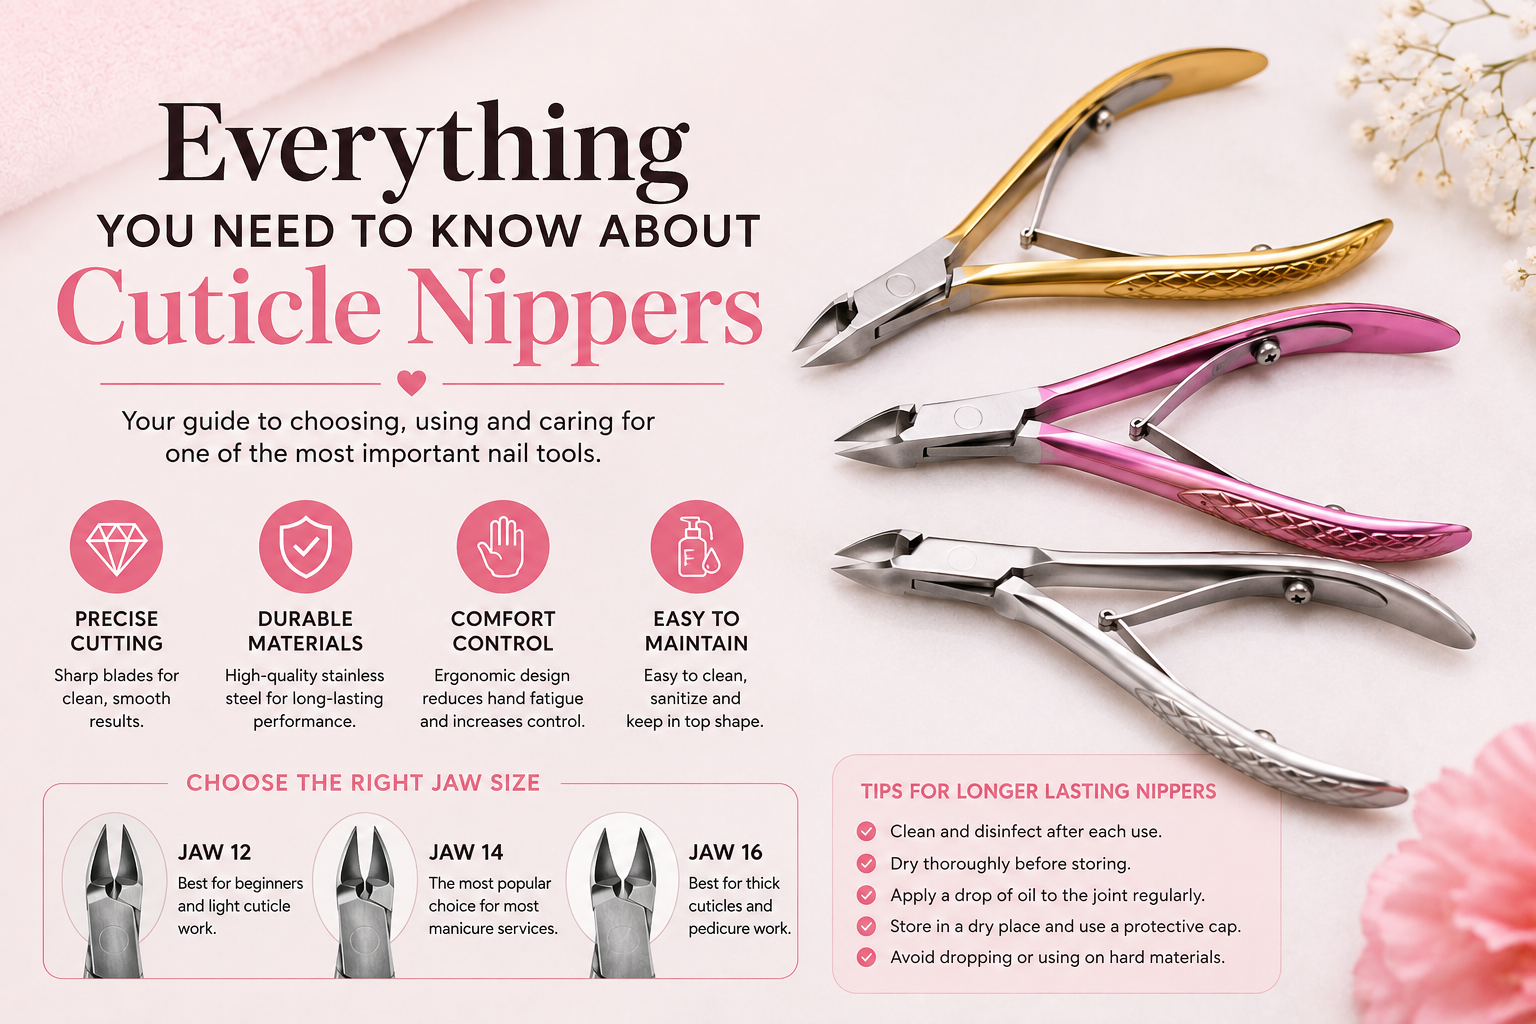
Jaw sizes explained: what jaw 8, 10, 12, 14, and 16 actually mean
Jaw size is the single most misunderstood specification on cuticle nippers — largely because the industry has never standardized its naming system. You will see nippers labeled by number (jaw 8, jaw 10, jaw 12, jaw 14, jaw 16), by fraction (¼ jaw, ½ jaw, full jaw), and by millimeters (3mm, 5mm, 7mm). These all describe the same thing: the length of the cutting blade from the hinge to the tip.
There is an important caveat: measurements vary slightly between brands because professional sharpening is done by hand, giving a tolerance of roughly ±0.5mm. Always check a brand's specific listed measurement rather than assuming the number maps exactly.
| Jaw number | Common name | Approx. blade length | Who it's for | Best use case |
|---|---|---|---|---|
| Jaw 8 | ⅛ jaw / Micro | ~2–2.5 mm | Niche / specialty use | Very fine detail work, small nails, art-level precision. Rarely found outside specialist suppliers. |
| Jaw 10 | ⅕ jaw / Mini | ~3 mm | Detailed work, small hands | Tight cuticle areas, clients with small or unusually curved nails, areas where the nail bed bends steeply into the flesh. |
| Jaw 12 | ¼ jaw / Quarter | ~4–4.5 mm | Beginners, home users, acrylic techs | Minimal cuticle trimming, tight corners, ideal for those new to nippers. Maximum control, minimum coverage. |
| Jaw 14 | ½ jaw / Half ⭐ | ~5–5.5 mm | Most users — home and salon | The industry standard. Suits the widest range of nail types and hand sizes. If you buy one nipper, this is the size. Recommended for both beginners and professionals. |
| Jaw 16 | Full jaw | ~6.5–7.5 mm | Experienced professionals, pedi specialists | Maximum cutting depth, fast coverage for large cuticle areas, thick nail treatment, ingrown nail work. Primarily for professional use. Longer blade also means more re-sharpenings before replacement. |
Between-size options like jaw 13 (4mm) and jaw 15 (6mm) also exist and are popular with many techs who find the standard sizes too small or too large for their working style. These in-between options are worth exploring once you have experience with the standard sizes.
Section 05
Blade angle & inclination: the most overlooked specification
Blade inclination is probably the most overlooked component when choosing a nipper — but it is one of the most important for professional technicians. The inclination refers specifically to the angle at which the blade is positioned relative to the handle.
Think of it this way: if the blade is perfectly parallel to the handle, the angle is 0°. If it tilts toward the tip, it increases. Every nipper model has a different inclination, and this directly changes the angle at which you must hold the nipper while cutting.
A higher blade inclination means you can hold the nipper at a more comfortable, natural wrist position when accessing the cuticle zone — especially useful for pedicure work where the angle of approach is awkward. A lower inclination gives a more direct, "straight in" cut that some techs prefer for fingernail manicures.
Some nippers also feature a small "heel" or protrusion on the cutting part. The height of this heel affects the depth of skin capture — nippers without a heel are recommended for clients with very thin or delicate cuticles, as they allow shallower, more controlled bites.
Section 06
Materials: carbon steel, stainless steel, and surgical steel
The metal used in a nipper determines how sharp it can get, how long it stays sharp, whether it rusts, and how it responds to sterilization. This is where cheap tools fail immediately and where professional tools justify their price over time.
Standard stainless steel (low-grade)
Found in drugstore nippers and low-cost bulk tools. Stainless steel contains at least 10.5% chromium, which gives it corrosion resistance — but cheap stainless is soft. Blades dull quickly, often after just a few uses, and cannot be resharpened to a fine edge. The label "stainless steel" on packaging tells you nothing about the quality. Always check the steel grade if you can find it.
High-grade stainless steel (AISI 420 / 420J2)
This is the standard for professional nail tools. Grade 420 stainless contains enough carbon (around 0.3–0.4%) to be hardened while still maintaining the chromium content needed for rust and corrosion resistance. It survives autoclave sterilization, repeated immersion in disinfectants, and years of daily use. Staleks Pro, Nghia, and most serious professional brands use AISI 420 or equivalent.
High-carbon steel (uncoated)
Pure high-carbon steel holds a sharper, harder edge than standard stainless because carbon increases the steel's hardness dramatically. The downside: it has no chromium, so it will rust if exposed to moisture. Tools made of uncoated high-carbon steel require thorough drying after every cleaning, oiling of the blade and joint, and careful storage. In exchange, you get a blade that can be sharpened to a near-surgical edge and holds that edge longer between resharpenings.
High-carbon stainless steel (surgical steel / FINOX)
This is the premium category — and what separates fine German and Japanese instruments from everything else. High-carbon stainless combines a high chromium content (rust resistance) with elevated carbon levels (hardness and edge retention). The result is a blade that is both rust-resistant and sharper than standard stainless. GERmanikure's FINOX line uses high-carbon stainless steel imported from Sweden; Tweezerman's Rockhard series uses German steel. These tools cost significantly more but last decades when cared for properly.
| Property | Low-grade stainless | Pro stainless (420) | High-carbon steel | High-carbon stainless |
|---|---|---|---|---|
| Edge sharpness | Poor | Good | Excellent | Excellent |
| Edge retention | Poor | Good | Very good | Best |
| Rust resistance | Good | Excellent | Poor — needs oiling | Excellent |
| Autoclave safe | Usually | Yes | Risky — can rust | Yes |
| Resharpenable | Rarely | Yes | Yes | Yes |
| Best for | One-time use | Professional salon | Home users, careful care | High-end professional |
| Price range | $3–10 | $15–50 | $20–60 | $40–120+ |
Section 07
Spring types: single, double, and barrel
The spring is what opens the nipper after each cut. It sounds minor, but spring quality and type have a significant impact on hand fatigue during long services and on the feel of the tool overall.
Single spring
An S-shaped or curved piece of metal along one side of the handle. Simple to replace and usually guaranteed for life. Less "bounce-back" than double spring. Preferred by techs who want a quieter, softer opening action. Good for beginners because the resistance is gentle.
Double spring
Two curved metal strips meeting in the middle between the handles. More bounce-back, more consistent resistance between cuts. Smoother and more snappy. Reduces the micro-effort needed to reopen the nipper between each snip — this adds up enormously over a full day of services.
Barrel spring
A cylindrical coil spring at the joint. Very consistent tension and very durable. Less common in standard cuticle nippers but found in some high-end and podiatry-grade tools. Provides a mechanical, precise feel.
For professional use, double spring is the preferred choice — the consistent tension and faster reset significantly reduce hand fatigue over a full appointment book. For home use, either single or double spring works well; choose based on what feels most comfortable in your hand.
Section 08
How to use cuticle nippers correctly, step by step
Technique matters more than the tool. A quality nipper used badly still tears skin and produces uneven results. Here is how to do it right.
-
1Soften the cuticle
Soak fingertips in warm water for 5–10 minutes, or apply a professional cuticle remover gel and let it work for 2–3 minutes. Never trim dry cuticles — dry skin resists the blade and forces you to use more pressure, increasing tear risk and hand strain. The cuticle should be soft, slightly translucent, and easy to move.
-
2Push back gently
Use a cuticle pusher (metal, wooden, or rubber tip) to gently move the loosened cuticle back toward the nail base. This separates the live skin from the dead tissue and reveals the pterygium — the thin, transparent dead skin on the nail plate that you will be removing. Do not force or dig. Light pressure is enough.
-
3Master your grip
Hold the nipper firmly in your palm with your index finger resting near the hinge — not at the tip. Thumb and index finger on the handles, middle finger below for support and stability. This position gives you leverage, control, and the ability to feel exactly how much pressure you are applying. Think "pinch and guide," not "squeeze and cut."
-
4Work in small, precise snips
Start at one side of the nail and work across in small, connected bites — never try to remove the entire cuticle in one squeeze. Each snip should remove only the dead tissue you can see. Keep the blade flat against the nail plate, angled slightly upward away from the skin. If you feel resistance, the skin is live — stop and reposition.
-
5Address the lateral folds last
The corners where the nail meets the skin (lateral nail folds) are where most nicking happens. Switch to a smaller jaw or a tapered/tower point tip for these areas. Approach at a shallower angle, and take even smaller snips.
-
6Finish with cuticle oil
Apply cuticle oil immediately after trimming. This soothes the nail bed, hydrates the remaining live cuticle tissue, and prevents the post-service dryness that leads to hangnails. Massage it in for 30 seconds. This is not optional — it is what keeps clients' cuticles healthy between appointments.
Section 09
How to choose the right nipper for your needs
There is no universally "best" nipper. The right choice depends on who you are, what you are doing, and how often. Here is how to think it through.
At-home beginner
Jaw size: 12 (¼ jaw) or 14 (½ jaw)
Tip shape: Standard / rounded
Steel: AISI 420 stainless
Spring: Either
Start with a reputable brand, a half-jaw standard nipper, and good cuticle oil. You do not need to spend $80 on your first pair — but do not buy a $4 drugstore nipper either. $20–35 from a known brand is the sweet spot.
Nail technician (fingernails)
Jaw size: 14 (½ jaw) primary + 12 (¼ jaw) for detail
Tip shape: Tapered for main work, tower point for corners
Steel: AISI 420 or high-carbon stainless
Spring: Double spring
Own at least two nippers in rotation so one is always sterilized. Invest in professional lines — you will use these thousands of times.
Nail technician (pedicure)
Jaw size: 16 (full jaw) for toes, 14 for detail
Tip shape: Tapered or tower point
Steel: AISI 420 or higher
Spring: Double spring
Toenails and toe cuticles are thicker and more challenging. A dedicated pedicure nipper with a full jaw handles this better than a fingernail nipper. Never use your fingernail nippers on toenails — it chips the blade.
High-volume salon
Jaw size: 14 and 16 for standard use
Tip shape: Assortment
Steel: High-carbon stainless
Spring: Double spring
Buy in sets, maintain a rotation of 3+ nippers per technician, and budget for professional resharpening every 6–9 months. The per-service cost of a quality nipper is cents. The cost of an infection lawsuit is not.
Section 10
Sanitation & sterilization: non-negotiable in a professional setting
Cuticle nippers break the skin barrier. That fact alone makes their sanitation protocol the most important part of professional nail care. An improperly disinfected nipper is a direct vector for bacterial infection, fungal contamination, and blood-borne pathogens.
-
1Clean
Immediately after each client, use a brush and soap to physically remove all debris — skin fragments, cuticle tissue, oil residue — from the blades, hinge, and handle. This step is mandatory before disinfection; disinfectants cannot penetrate organic matter effectively.
-
2Rinse & dry
Rinse under running water and dry thoroughly. For stainless steel, moisture left in the hinge causes slow corrosion even in high-grade tools.
-
3Disinfect
Fully submerge in an EPA-registered professional disinfectant solution (such as Barbicide or equivalent) for the full contact time listed on the label — usually 10 minutes. Alternatively, wipe thoroughly with 70% isopropyl alcohol. Note: alcohol is a disinfectant, not a sterilant — it does not kill all pathogens.
-
4Sterilize (professional standard)
For complete sterilization — killing all microbial life including spores — use an autoclave (steam sterilizer). This is the gold standard for professional salon use. Your nippers must be rated for autoclave use; AISI 420 and high-carbon stainless steel handle this well. Dry heat sterilizers are an alternative where autoclaves are not available.
-
5Store correctly
Place sterilized tools in a sealed, clean container or sterilization pouch. Do not store loose in a drawer with other tools — contact with unsterilized items renders the sterilization void.
Section 11
Maintenance & sharpening: making your investment last
A quality nipper is an investment — one that can last 5, 10, even 20 years with proper care. Most nail technicians replace their nippers far too early simply because they do not maintain them.
How to tell when a nipper needs sharpening
The clearest sign is a change in how the cut feels. A sharp nipper parts the skin cleanly with minimal pressure — you should barely need to squeeze. A dull nipper grabs, tugs, or requires you to close the handles fully before the skin separates. If you notice any pulling sensation, or if the cut leaves a ragged edge rather than a clean line, it is time to sharpen.
Sharpening frequency
For professional technicians in daily use, sharpening every 6–9 months is typical for quality tools like Staleks Pro. For home users, once every 1–2 years or when you notice dullness. A 7mm (full jaw) blade has more material to remove during sharpening, so it tolerates more resharpening cycles before needing replacement.
Professional resharpening vs. DIY
Nipper sharpening is a specialized skill. The blade geometry — the angle, the beveled edge, the matching of both sides — must be maintained exactly or the tool will cut poorly even after sharpening. Send nippers to a professional tool sharpening service. Do not attempt to sharpen them with a file or stone unless you have specific training. The cost of professional resharpening is a fraction of the cost of a new quality nipper.
Daily care routine
- After every use, wipe blades clean and dry completely before storing.
- Apply a single drop of food-grade mineral oil or tool oil to the hinge once a week. Open and close several times to work it in.
- Never drop nippers on hard floors — even high-grade steel can chip a blade tip on impact.
- Store in a case, pouch, or protective sleeve. Blade tips are fragile and will be damaged by knocking against other metal tools.
- Do not use fingernail nippers on toenails. The thicker nail plate will chip blade edges that were sharpened for delicate cuticle work.
- If disinfecting with Barbicide or liquid disinfectants, do not soak longer than the recommended time — extended soaking accelerates corrosion at the joint.
Section 12
Top brands worth your money
This is not sponsored. These are the brands that consistently appear in professional nail tech communities, earn long-term loyalty, and hold up to the demands of salon work.
The benchmark for value-to-quality in professional nipper tools. Laser-sharpened, hand-finished blades in AISI 420 stainless. Multiple lines (Smart, Expert, Exclusive) at different price and quality tiers. Widely available and highly respected globally. Designed to be resharpened every 6–9 months.
Mid–Pro range · $20–80An institution in the nail tech community. Razor-sharp out of the box, pinpoint precision, and remarkable affordability. Long-term users with 30+ years of experience report consistent quality. D-series models are a community favorite. Not the longest-lasting blades, but excellent value and easily replaced.
Budget–Mid · $8–25Premium German engineering with a lifetime resharpening guarantee — send them back, they sharpen for free. The Rockhard series uses high-grade German steel. Higher upfront cost, but factoring in the resharpening warranty, the lifetime value is exceptional. Classic professional choice in the US market.
High-end · $35–70Solingen is the cutlery capital of the world, and GERmanikure's FINOX line uses high-carbon stainless steel from Sweden for blades that are harder and sharper than most competitors. Three jaw shapes, three sizes, box joint option. The top choice for techs who want the absolute best tool quality.
High-end · $40–100Japanese-made double spring nippers with a reputation for consistent quality and ergonomic comfort. Popular with techs who work long hours. Ultra-sharp beveled blades in micro nipper sizes. Excellent for detailed work and clients who prefer very precise, minimal cuticle removal.
Mid range · $20–50Known for fully customizable nippers — jaw size, spring type, handle length, and head shape can all be specified. Blades are resharpenable and springs are replaceable. Nails Magazine reported their nippers lasting up to 10 years with proper maintenance. Excellent choice for techs who want a bespoke tool.
Professional · $40–90Quick reference — the nail tech cheat sheet
-
Posted in
Best Cuticle Nippers, best cuticle nippers for nail techs, Cuticle Nippers, Jaw 12 Cuticle Nippers, Jaw 14 Cuticle Nippers, Jaw 16 Cuticle Nippers, NGHIA Cuticle Nippers, Professional Cuticle Nippers, Stainless Steel Cuticle Nippers